Get Start with Offerin AI
Offerin AI is your intelligent interview companion, designed to enhance your performance across all types of technical interviews.
We provide real-time AI assistance that seamlessly integrates with your interview process, offering instant support for coding challenges, behavioral questions, and online assessments with unparalleled discretion and reliability.
To get started with Offerin AI for your interview, choose a scenario that matches your needs:
Interview Copilot
To ace your interviews confidently, dedicate time to refining your interview skills and familiarizing yourself with this tool.
Connection Methods
Choose the best setup for your interview:
📱Dual-device Link Mode (Recommended)
- Interview on PC, view AI assistance on mobile
- Maximum discretion and flexibility
- Works with all interview formats
- No screen detection concerns
🌐Browser Mode
- Uses browser’s native audio
- Best for:
- Basic video interviews
- No screen monitoring
- Single screen setups
💻Local Desktop Client
- Local software for audio & screen capture
- Ideal for:
- Dual monitor setups
- Technical interviews
- Advanced features
Configure Audio
Browser Connection
Important Notice for MacOS Users
Due to MacOS security restrictions, browsers (including Chrome) cannot directly capture system audio.
To ensure full functionality:
- Try joining your interview platform via browser first
- If that’s not possible, download our desktop client for complete audio support
- Set up and test the desktop client before your interview to avoid last-minute issues.
Step 1
When selecting the audio source, choose the Browser option.
Step 2
Configure audio settings separately for macOS and Windows:
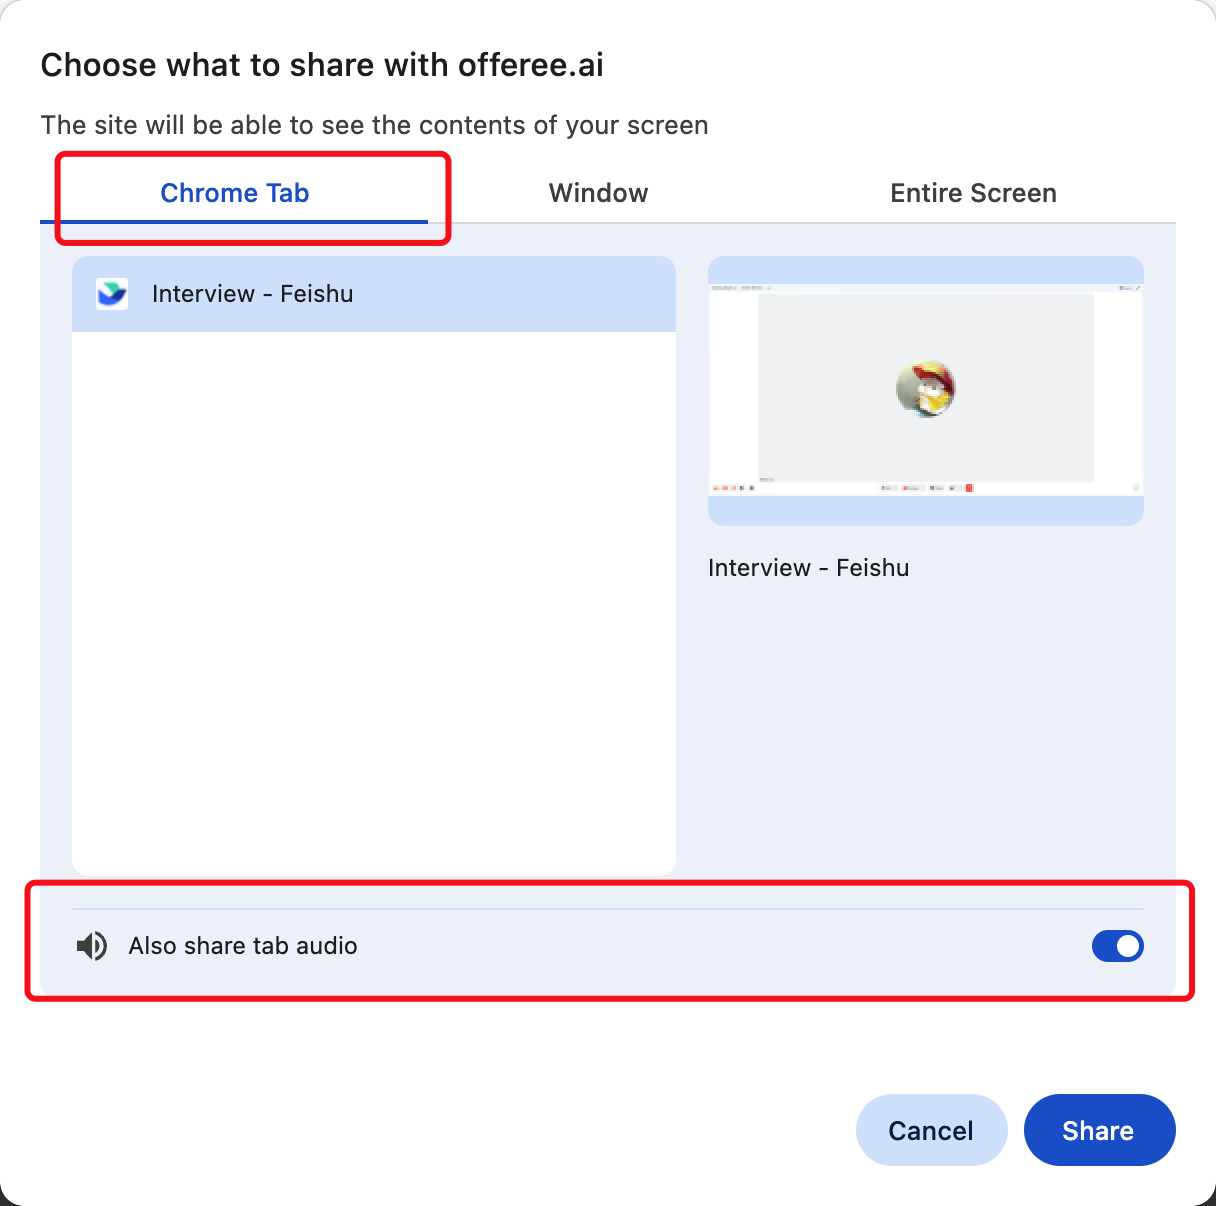
- MacOS: Select the corresponding meeting tab under
Chrome Taband enable theAlso Share tab audiooption to capture interview audio.
- Windows: In the pop-up dialog, select
Entire Screen, then choose any display. Be sure to check the option ofalso share system audio.
Step 3
Choose a voice recognition node closest to your location. Offerin AI offers global access points - select a region with latency under 100ms for optimal performance. You can view real-time latency for each region.
Local Client Connection
Step 1
Install the client, please refer to the detailed guide in How to install client app
Step 2
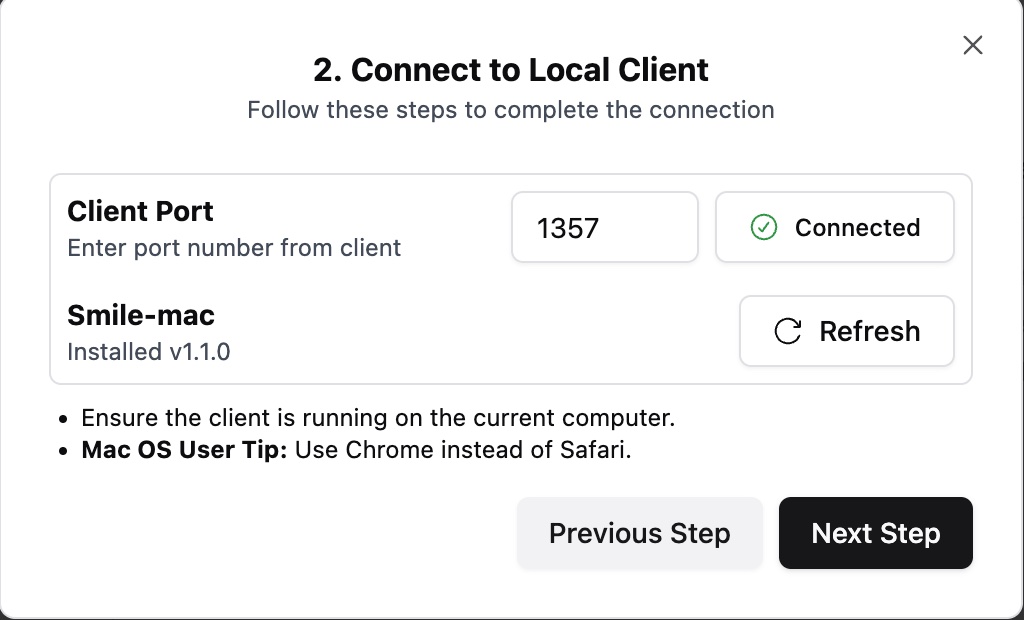
Follow the operation guide to connect the local client
Step 3
Test the audio for functionality. If the volume bar is not responding, check if the audio source is correct or try restarting the client
Step 4
Choose a voice recognition node closest to your location. Offerin AI offers global access points - select a region with latency under 100ms for optimal performance. You can view real-time latency for each region.
Dual-device Link
When you conduct interviews on the computer and use your phone (tablet, computer, etc.) as a display screen for Our AI Copilot.
Step 1
Install client app, refer to the detailed guide in How to install client app
Step 2
Open web app on your mobile device. Create an interview room and select the “Dual-device Link” mode.
Step 3
-
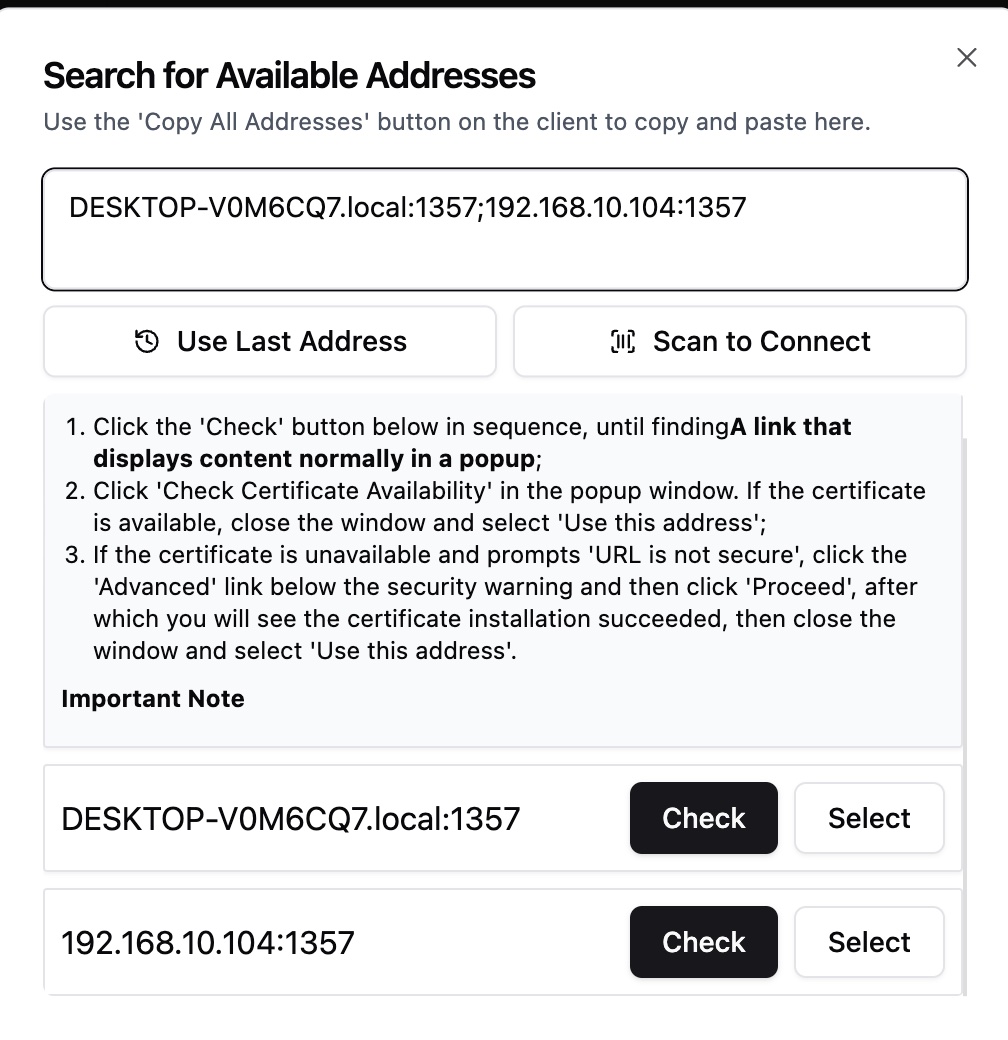
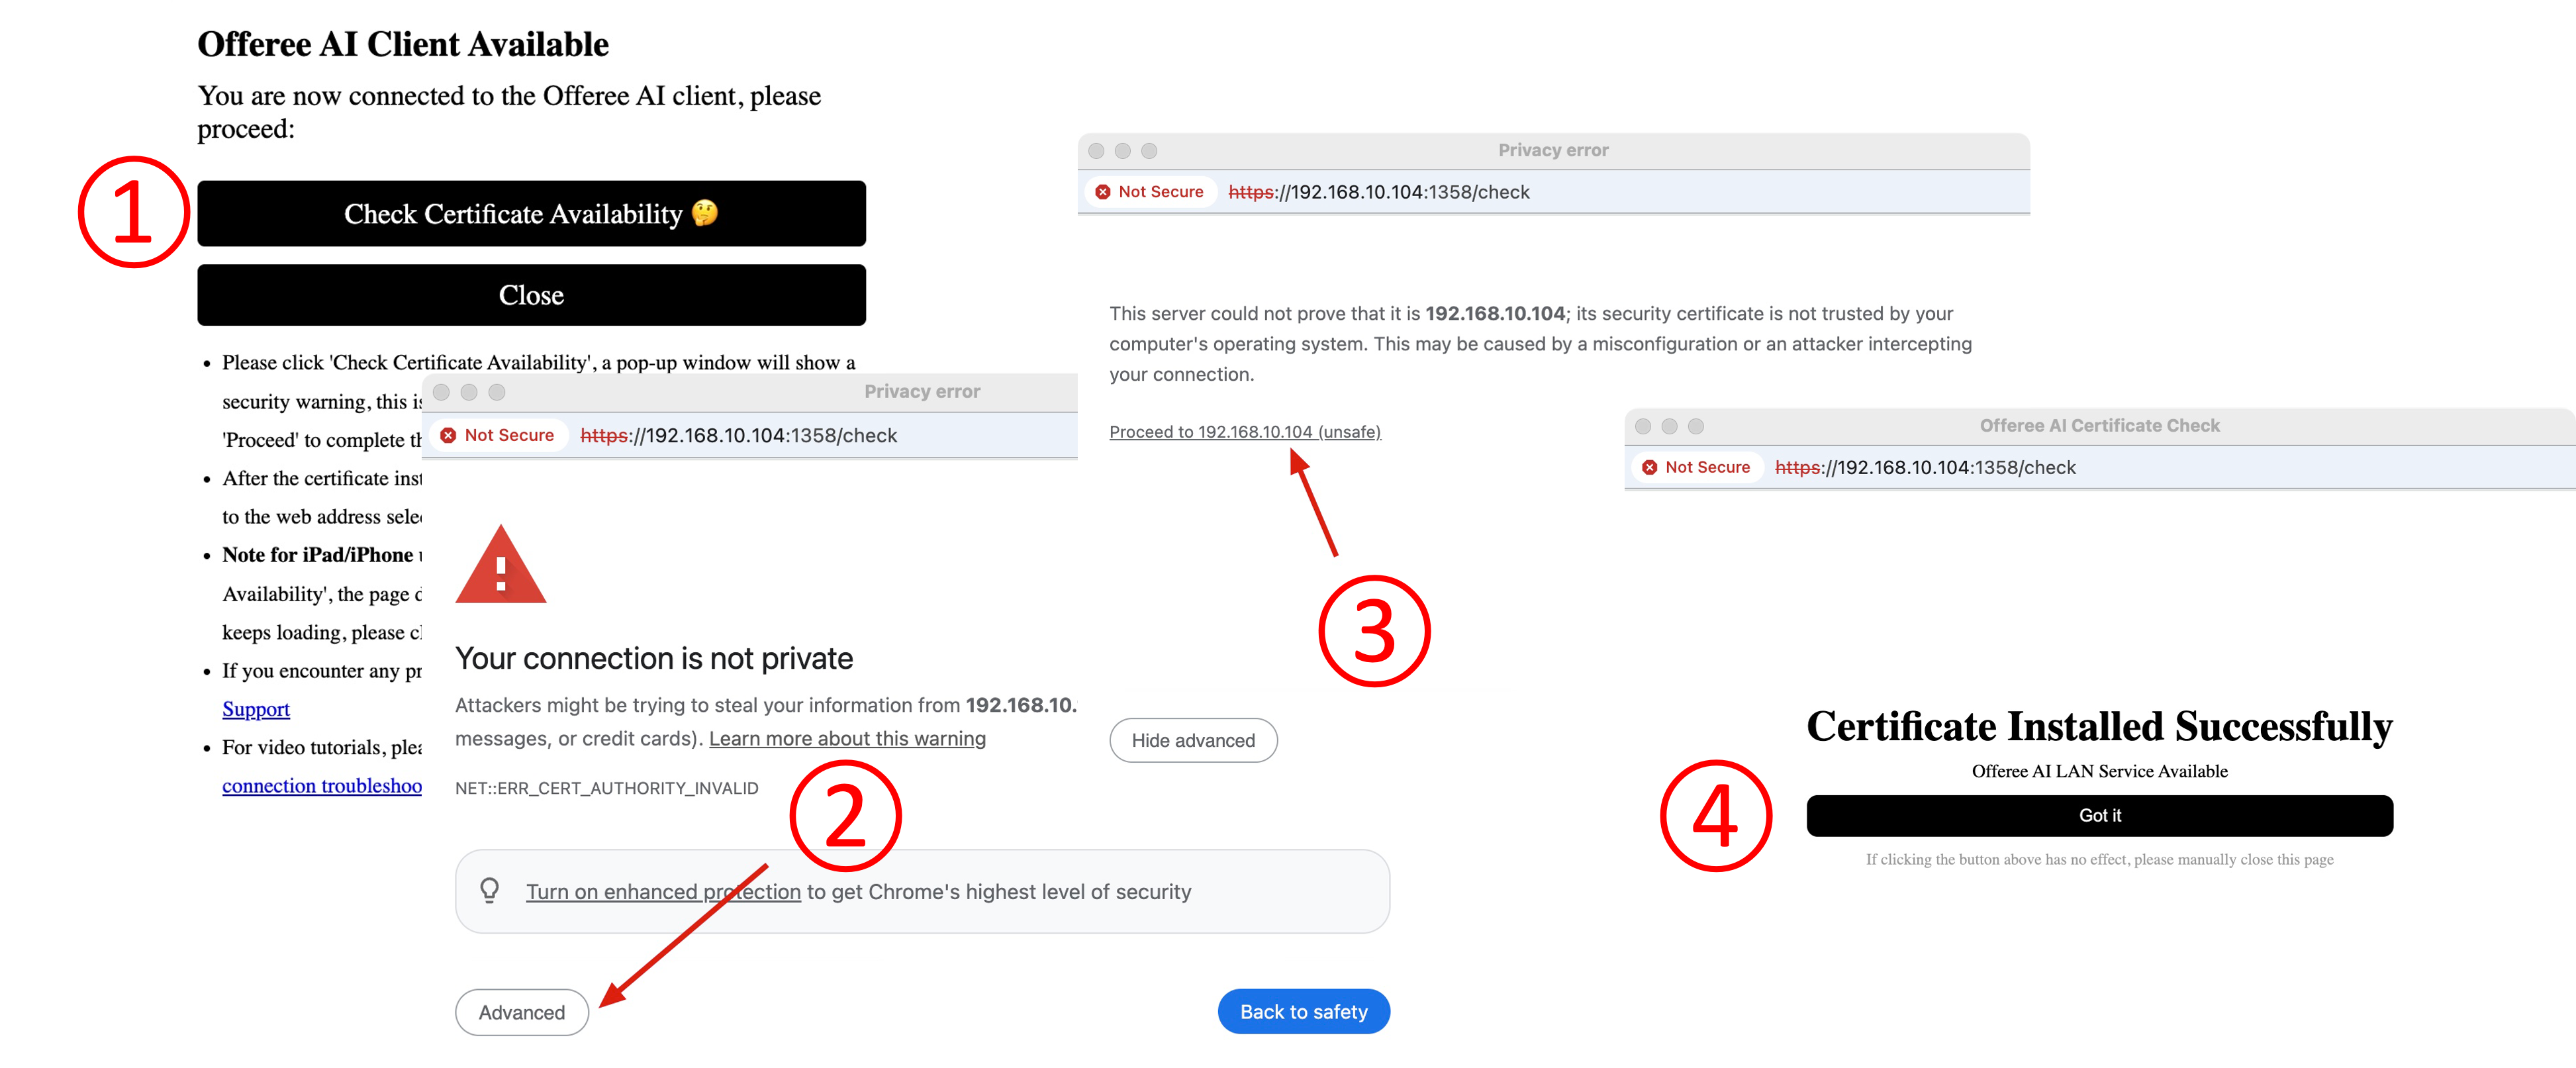
Configure the client address. You can quickly obtain the address by scanning the QR code on the client with a QR code scanner or by entering the address manually
-
There may be multiple addresses; click
Checkone by one to verify the certificate’s availability until successful
-
Choose
Check Certificateto verify if the certificate is usable. A new webpage indicating it is not secure will open, which is normal -
Click on “Advanced,” then click “Proceed to continue”; note that different operating systems and browsers may have slightly different prompts on this page
-
You will then see a “Successfully Installed” message. Return to the OfferinAI webpage and choose
Selectfor the corresponding address
Step 4
Test audio input, if the volume bar is not responding, check if the audio source is correct or try restarting the client.
Step 5
Choose a voice recognition node closest to your location. Offerin AI offers global access points - select a region with latency under 100ms for optimal performance. You can view real-time latency for each region.
Troubleshooting Network Issues
Common Solutions
If you’re on a restricted network (company/campus WiFi), try these options:
- Connect through your phone’s mobile hotspot
- Use your computer as a hotspot
Pro Tips
- Corporate firewalls may block our service
- A direct internet connection typically works best
- Test your connection before the interview starts
Interview Tips
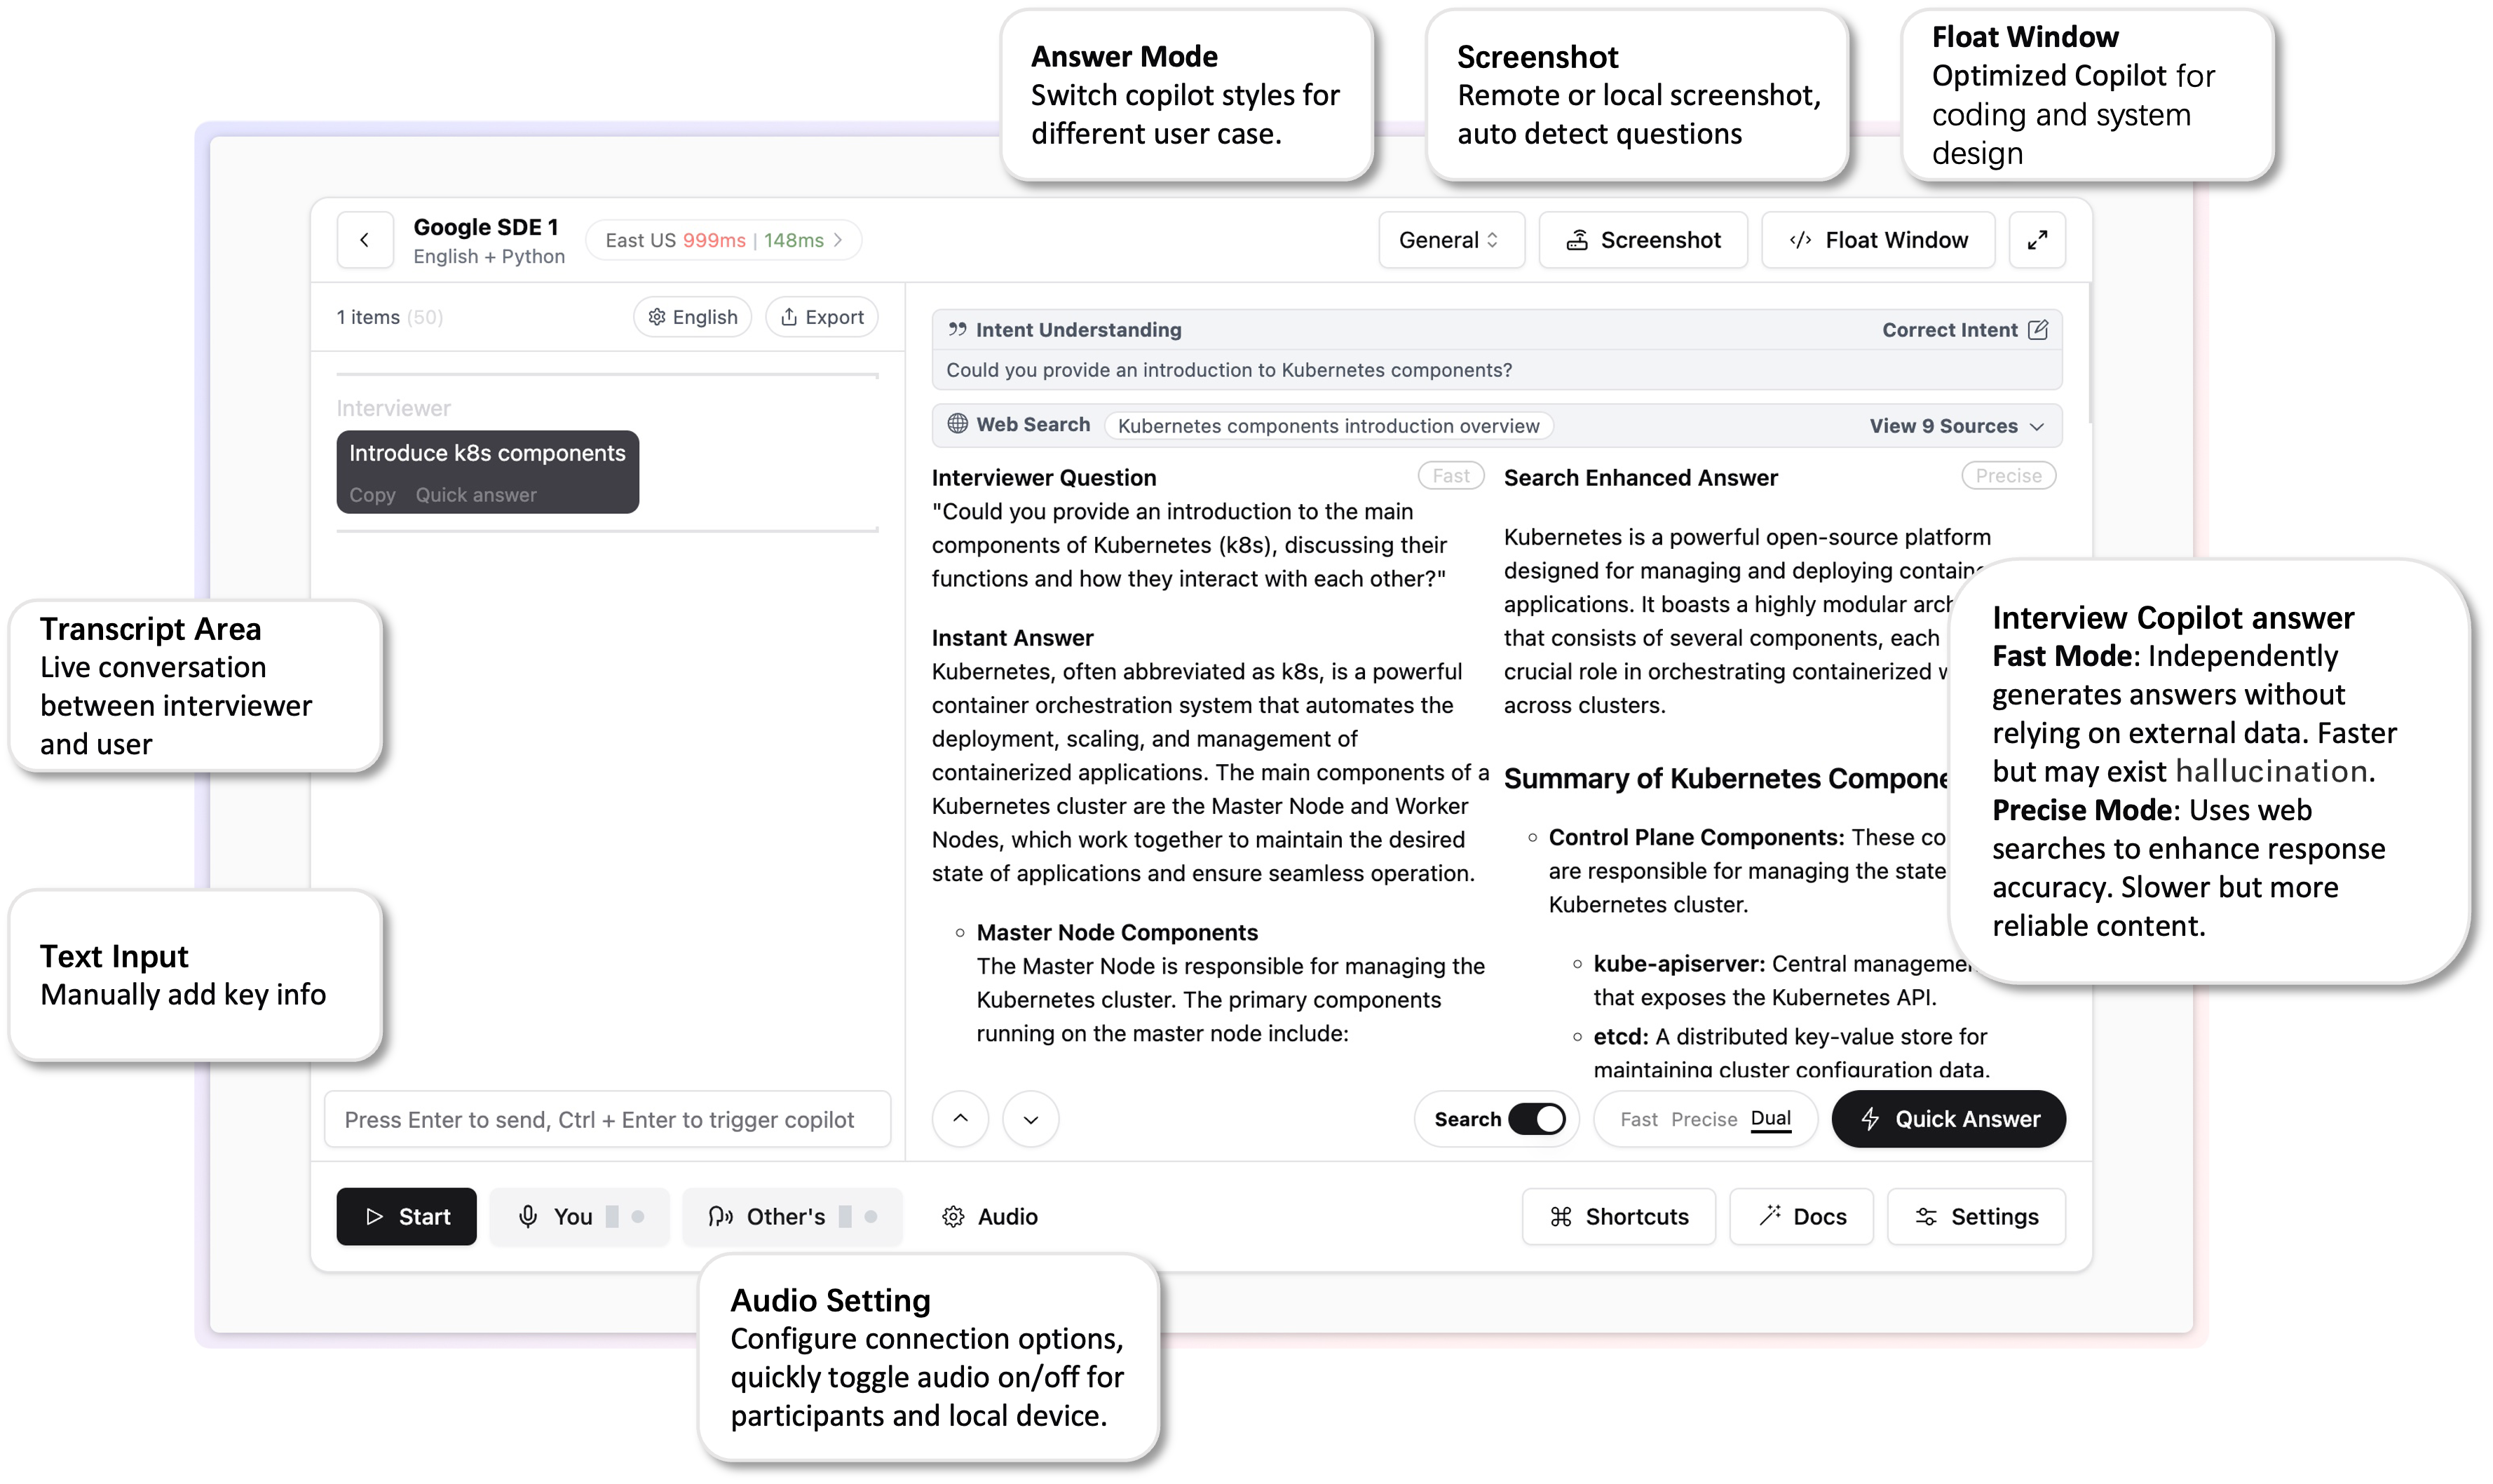
Switch Response Modes
We offer various response modes to suit different interview scenarios, as detailed below:
- General: Standard response mode suitable for most interview situations.
- Resume Enhanced: Based on your resume content for more personalized responses, ideal for experience and project-focused interviews.
- Behavioral: Uses your resume and the STAR method to generate responses, suitable for behavioral interviews.
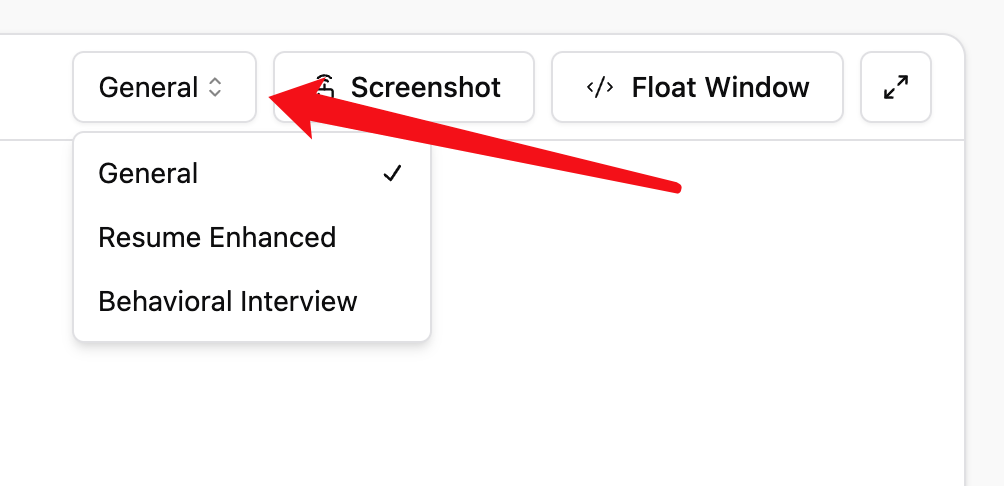
Difference Between “Fast Mode” and “Precise Mode”
To balance the speed and precise of Copilot’s response, we provide two modes. By default, both modes are triggered simultaneously, allowing you to freely refer and use:
- Fast Mode: Generates an answer immediately. It’s very quick, providing responses in seconds, but may exist hallucination issues.
- Precise Mode: First extracts the interviewer’s intent from the chat, conducts an online search for related information, and then generates a response through the model. This mode is slower but generally yields accurate responses. However, poor-quality search results can lead to unusable responses.
We recommend combining both modes for the best performance.
Quickly Switching Answer Layouts
By default, speedy and accurate responses are displayed side by side. If you need to view one response full-screen, use the following method:
Multiple Trigger Modes
In the “Copilot Settings” dialog at the bottom right of the interview interface, we’ve prepared several assistive trigger modes:
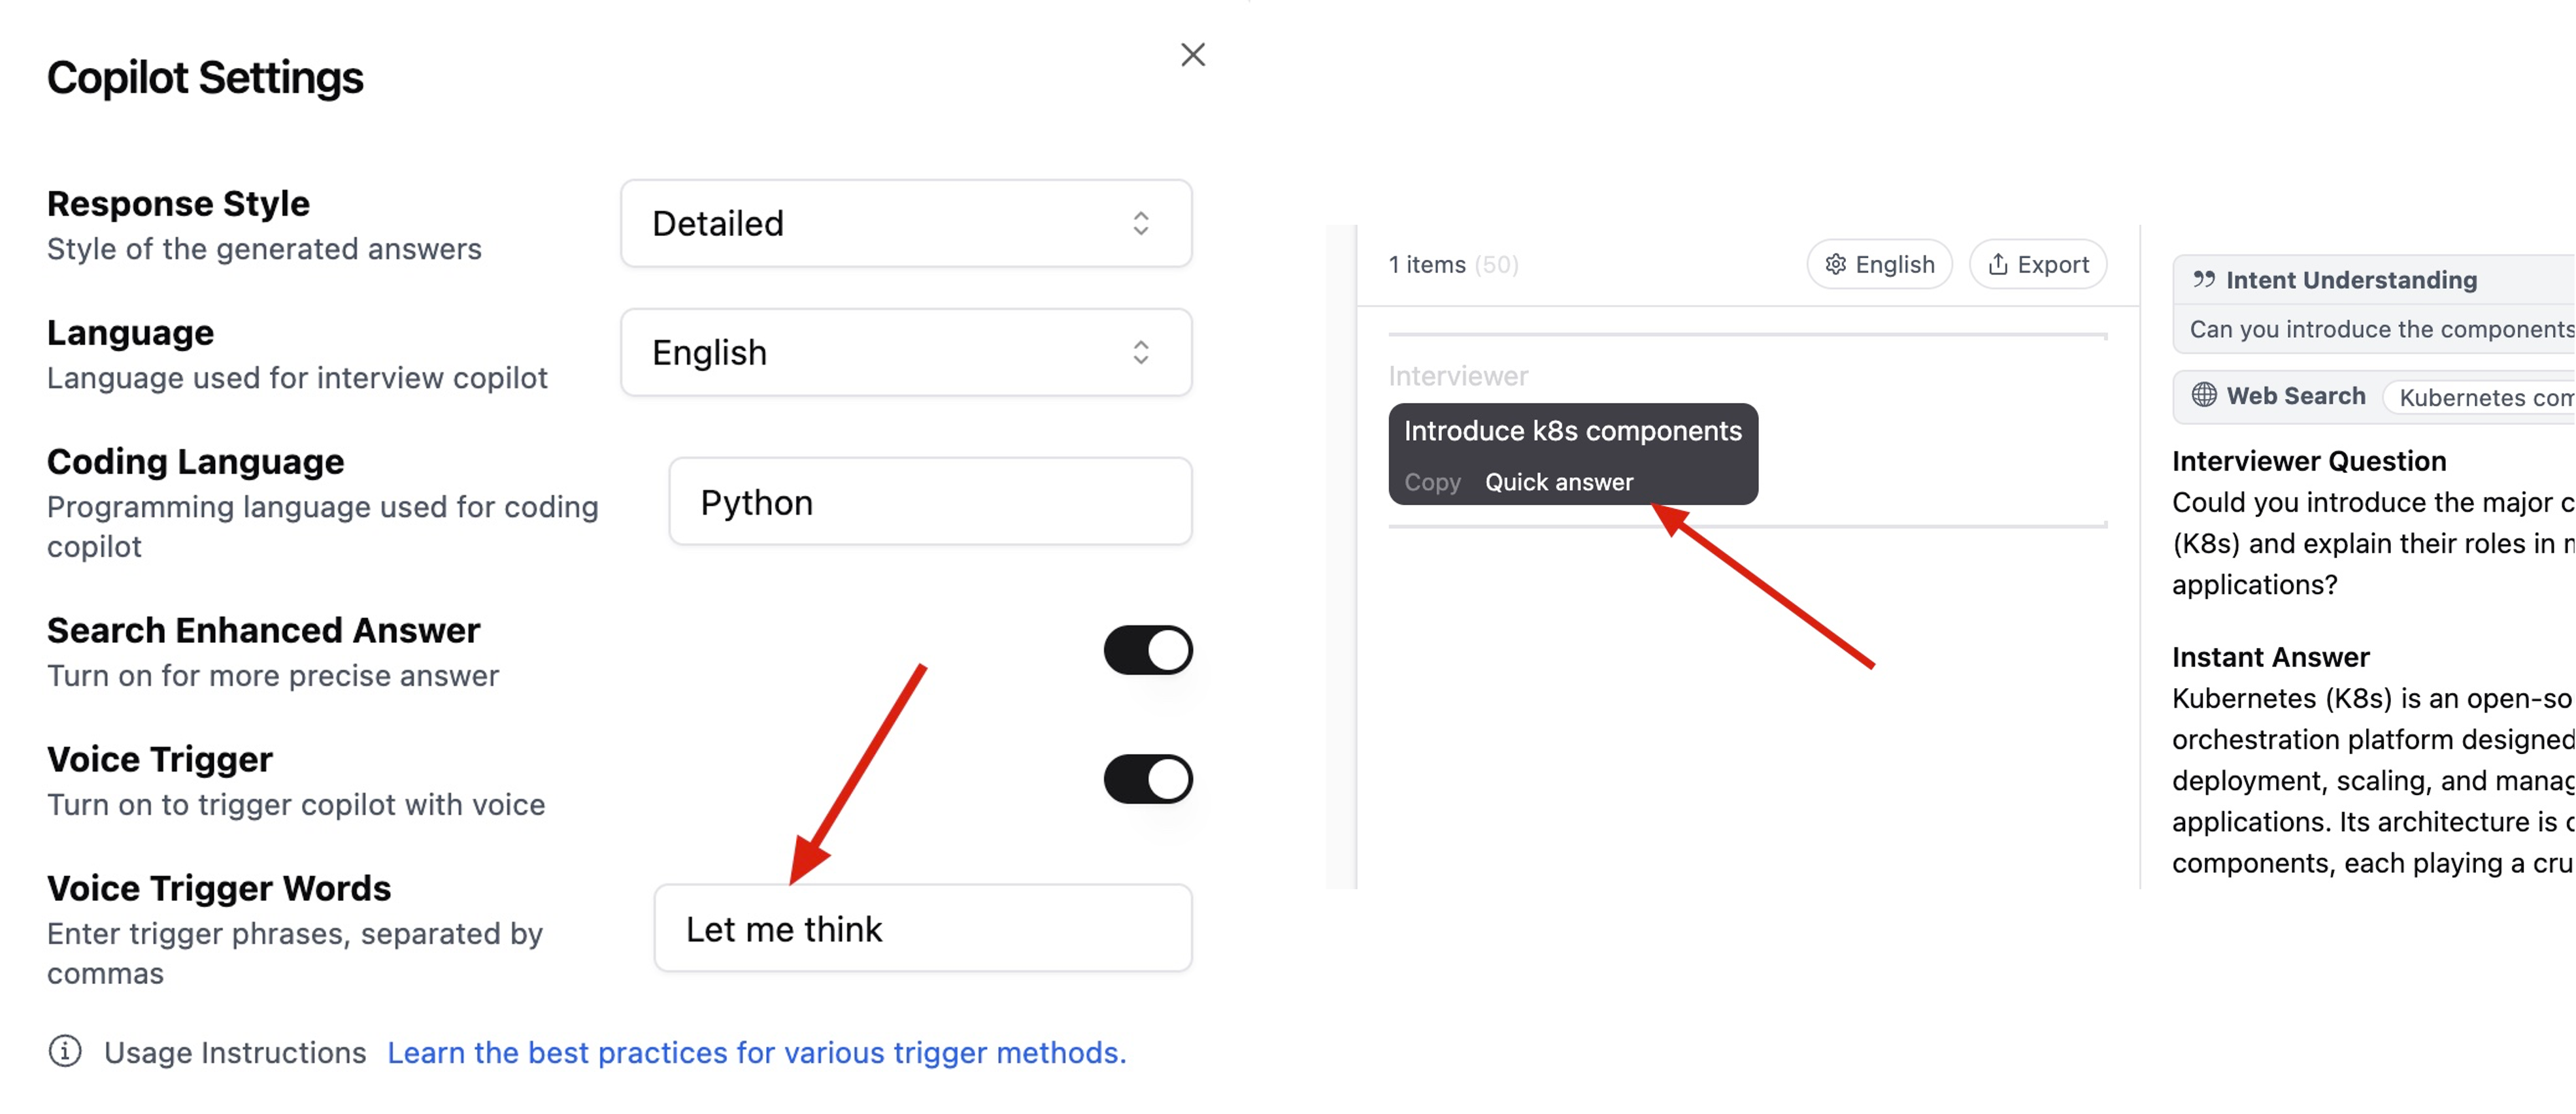
Currently, you can trigger responses in the following ways:
- Direct Trigger: Click the “Quick Response” button at the bottom right to trigger a response.
- Voice Trigger: Set custom trigger words in settings. When you say a trigger word (e.g., “Let me think”), a response triggers. Avoid monotony by setting multiple trigger words, separated by commas.
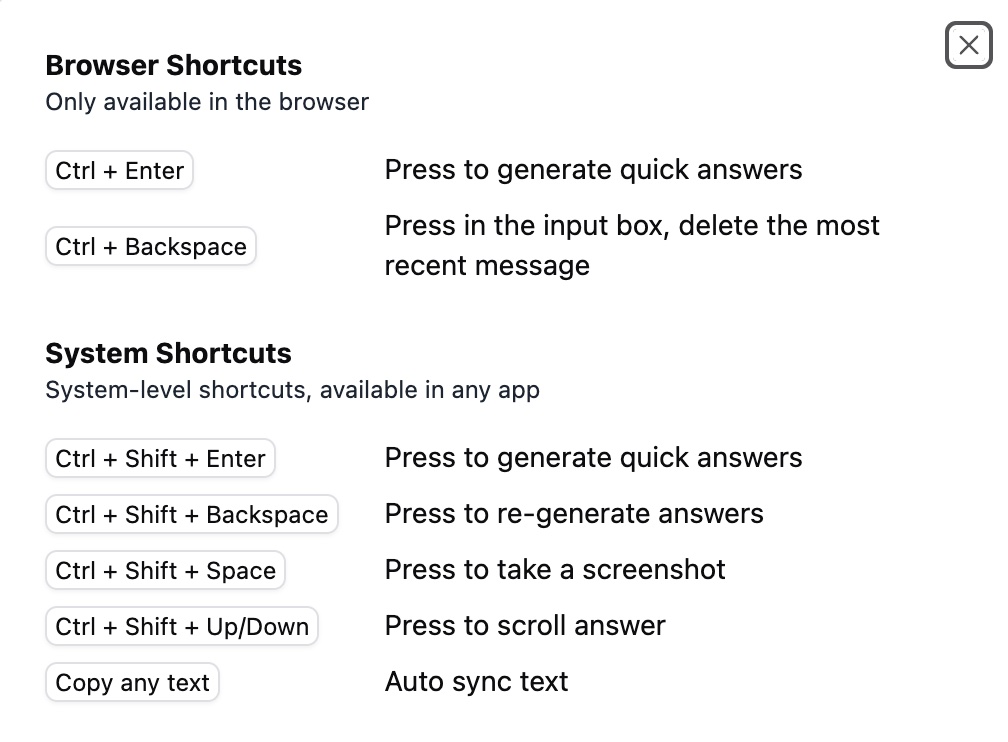
- Shortcut Trigger: Use a custom shortcut key to trigger a response; check all shortcuts in the “Shortcuts” popup at the bottom right of the interview assistant.
- Chat Bubble Trigger: Click the
Answerbutton below a chat bubble to send its content to the model for generating a response.
Despite the numerous trigger modes, direct triggers or shortcut triggers remain the most reliable. Uncontrolled factors during interviews can impact performance, so choose the most confident trigger method and practice regularly.
Shortcuts
provides a variety of shortcuts to avoid the need for a mouse during interviews.
Coding Copilot
Getting Started
-
Based on the previously set up connection in Interview Copilot, configure your connection settings. It is recommended to use
Client ConnectionorDual-device Link. -
Click on the small window mode in the top right corner of the interview screen to switch to Coding Copilot mode.
-
Use the shortcut
Ctrl + Shift + Spaceto capture a screenshot and automatically recognize the problem, or enter the problem description in the left editor pane. You can focus on the core idea and do not need to provide a full problem description.
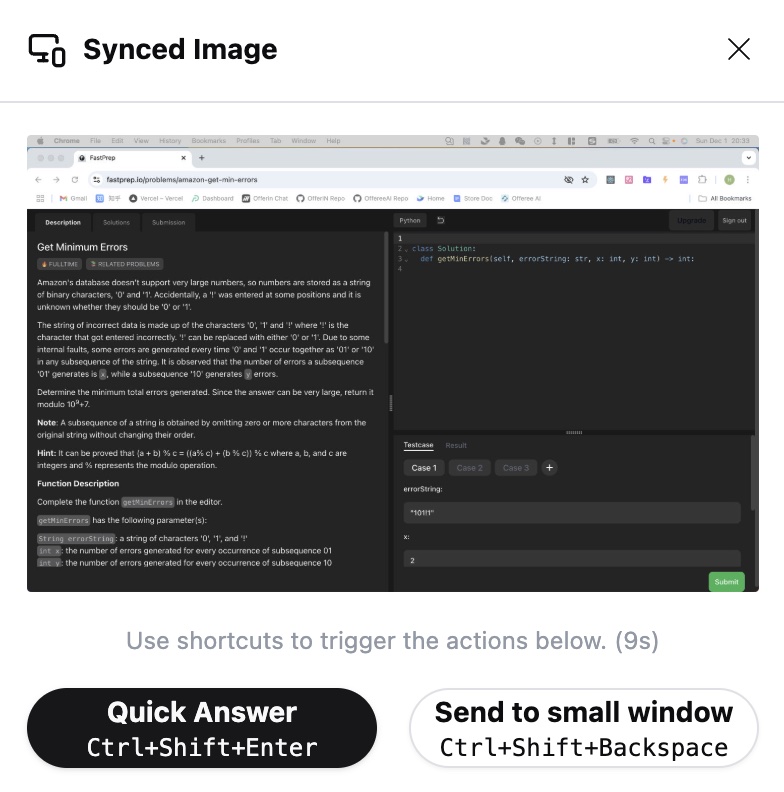
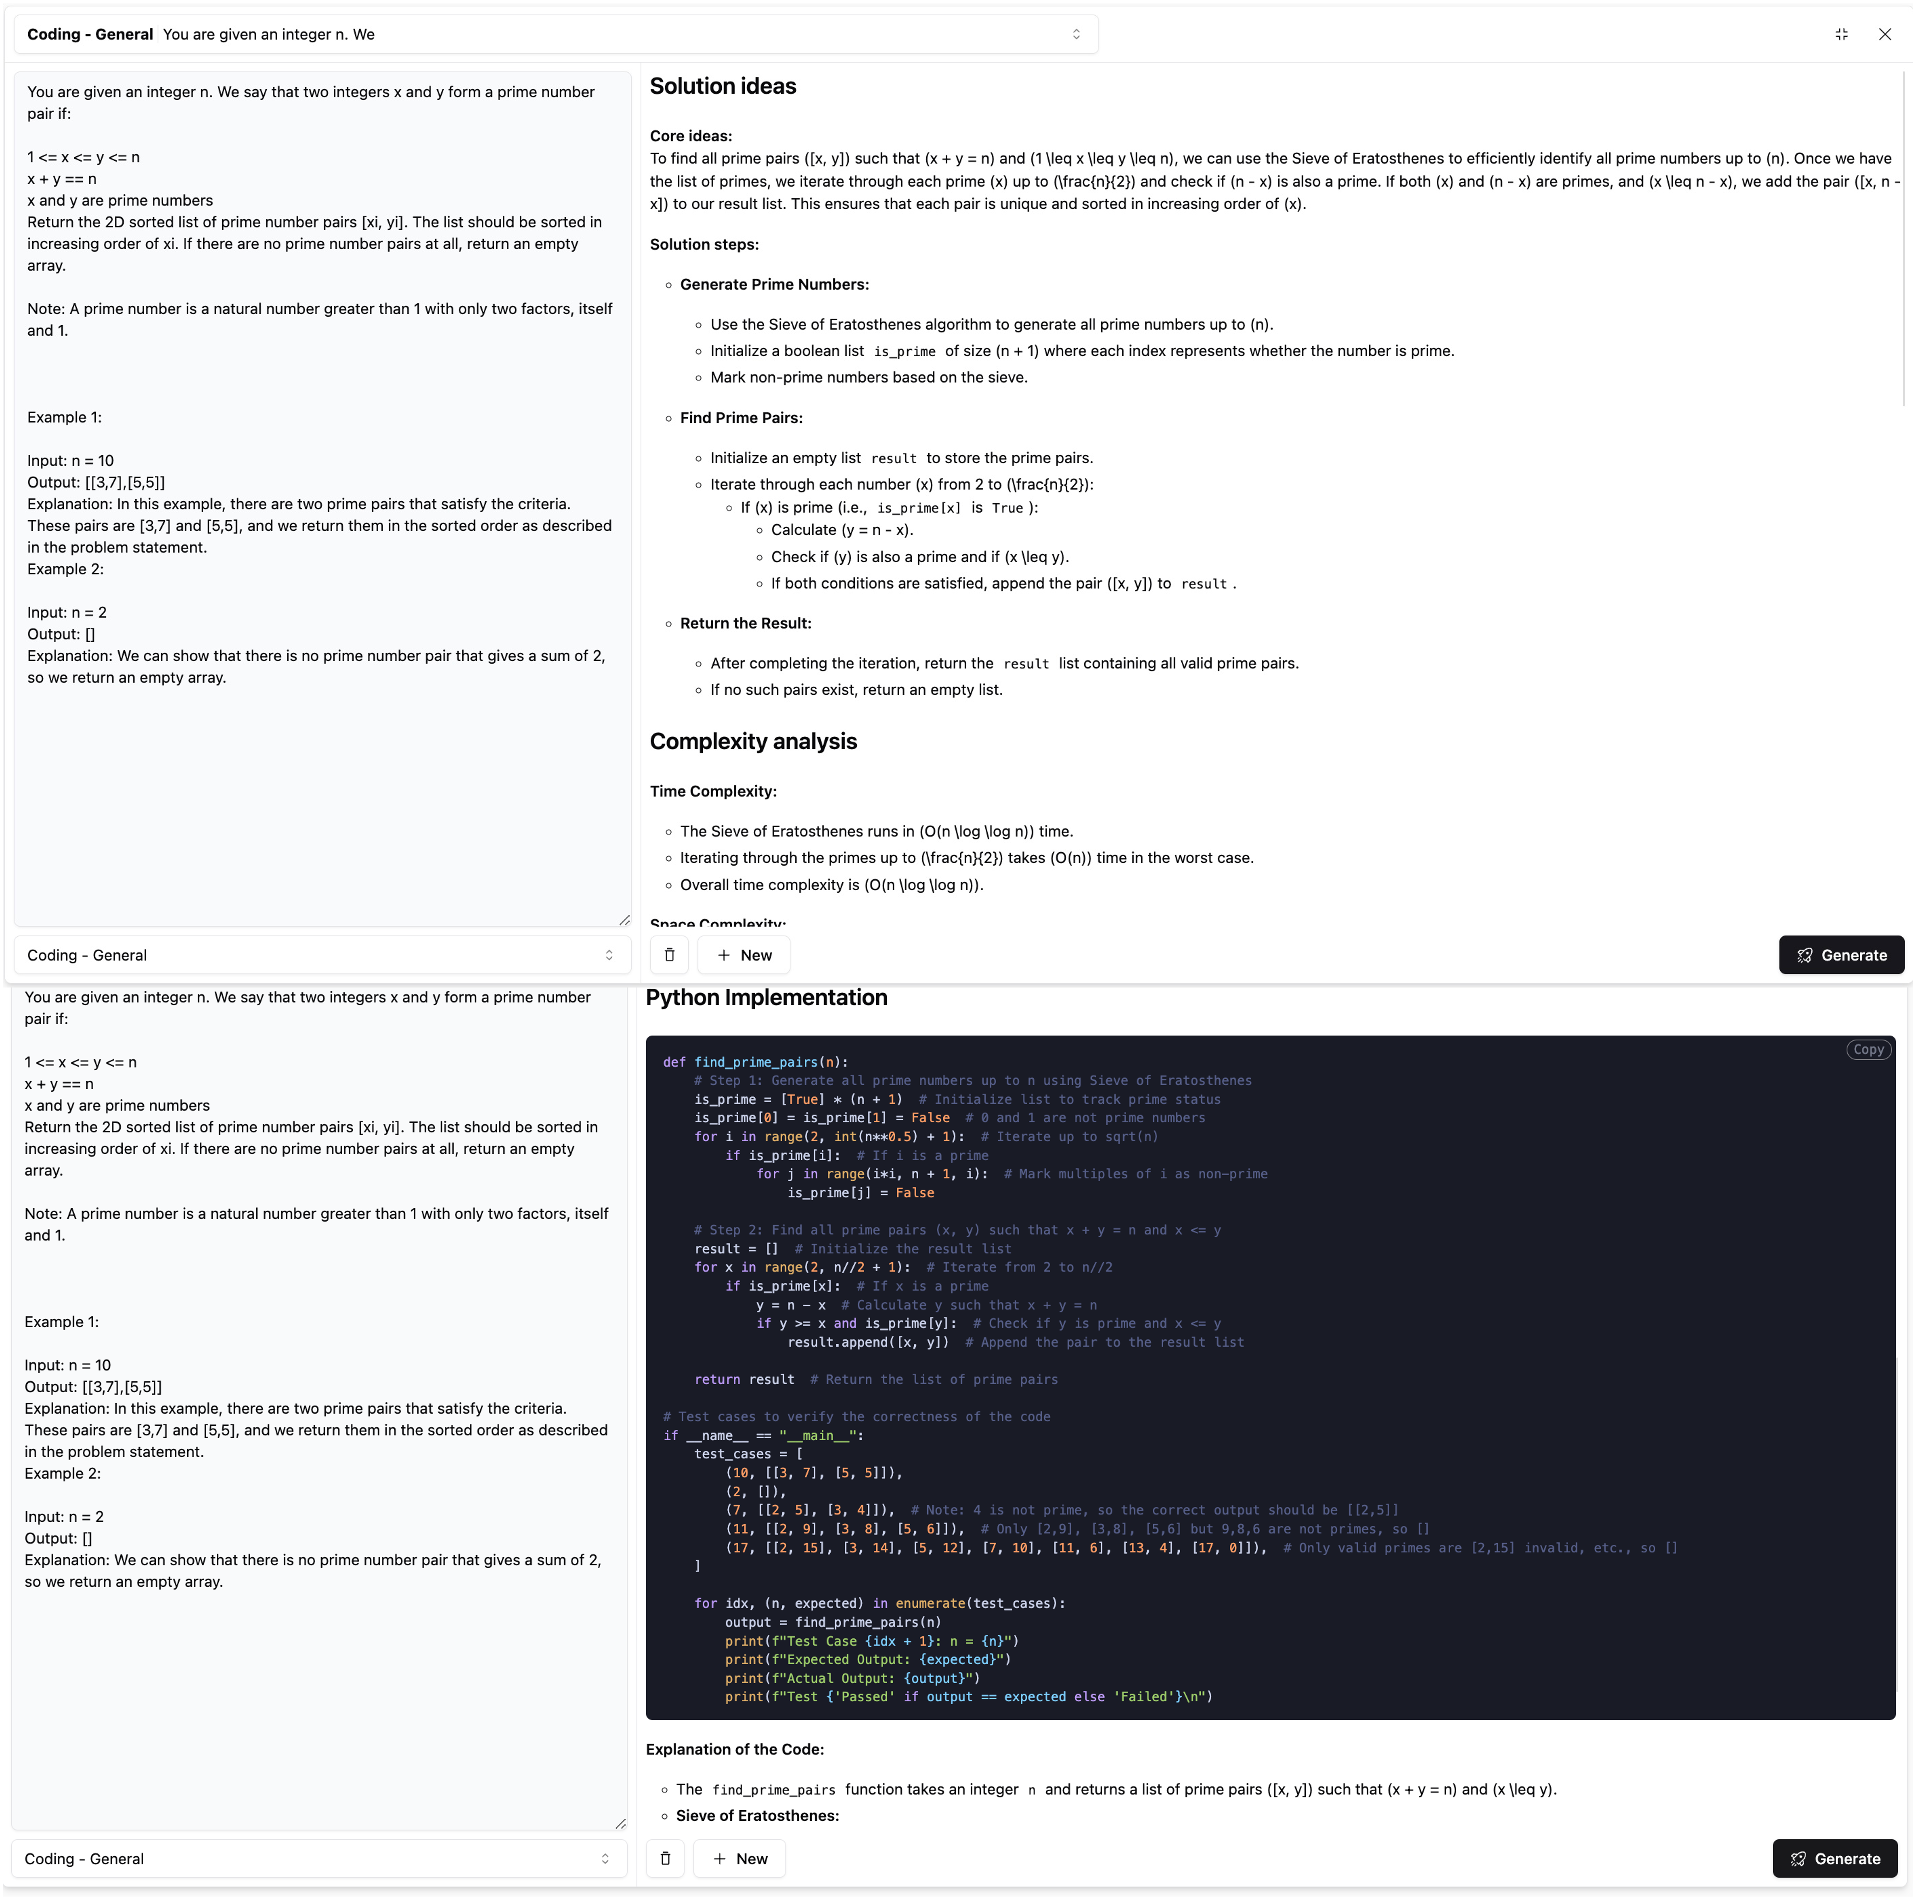
- Coding Copilot will automatically generate a solution approach, code implementation, and also provide an analysis of time complexity and space complexity, going beyond just simple code implementation.
OA Copilot
Getting Started
- Download the client on the computer you’ll be using for the interview or test.
- On the display device, open the OfferinAI webpage and choose either “Local Client” or “Dual-device Link.”
- Follow the prompts in the pop-up guide, referring to Local Client Connection or Dual-device Link Tutorial to complete the setup.
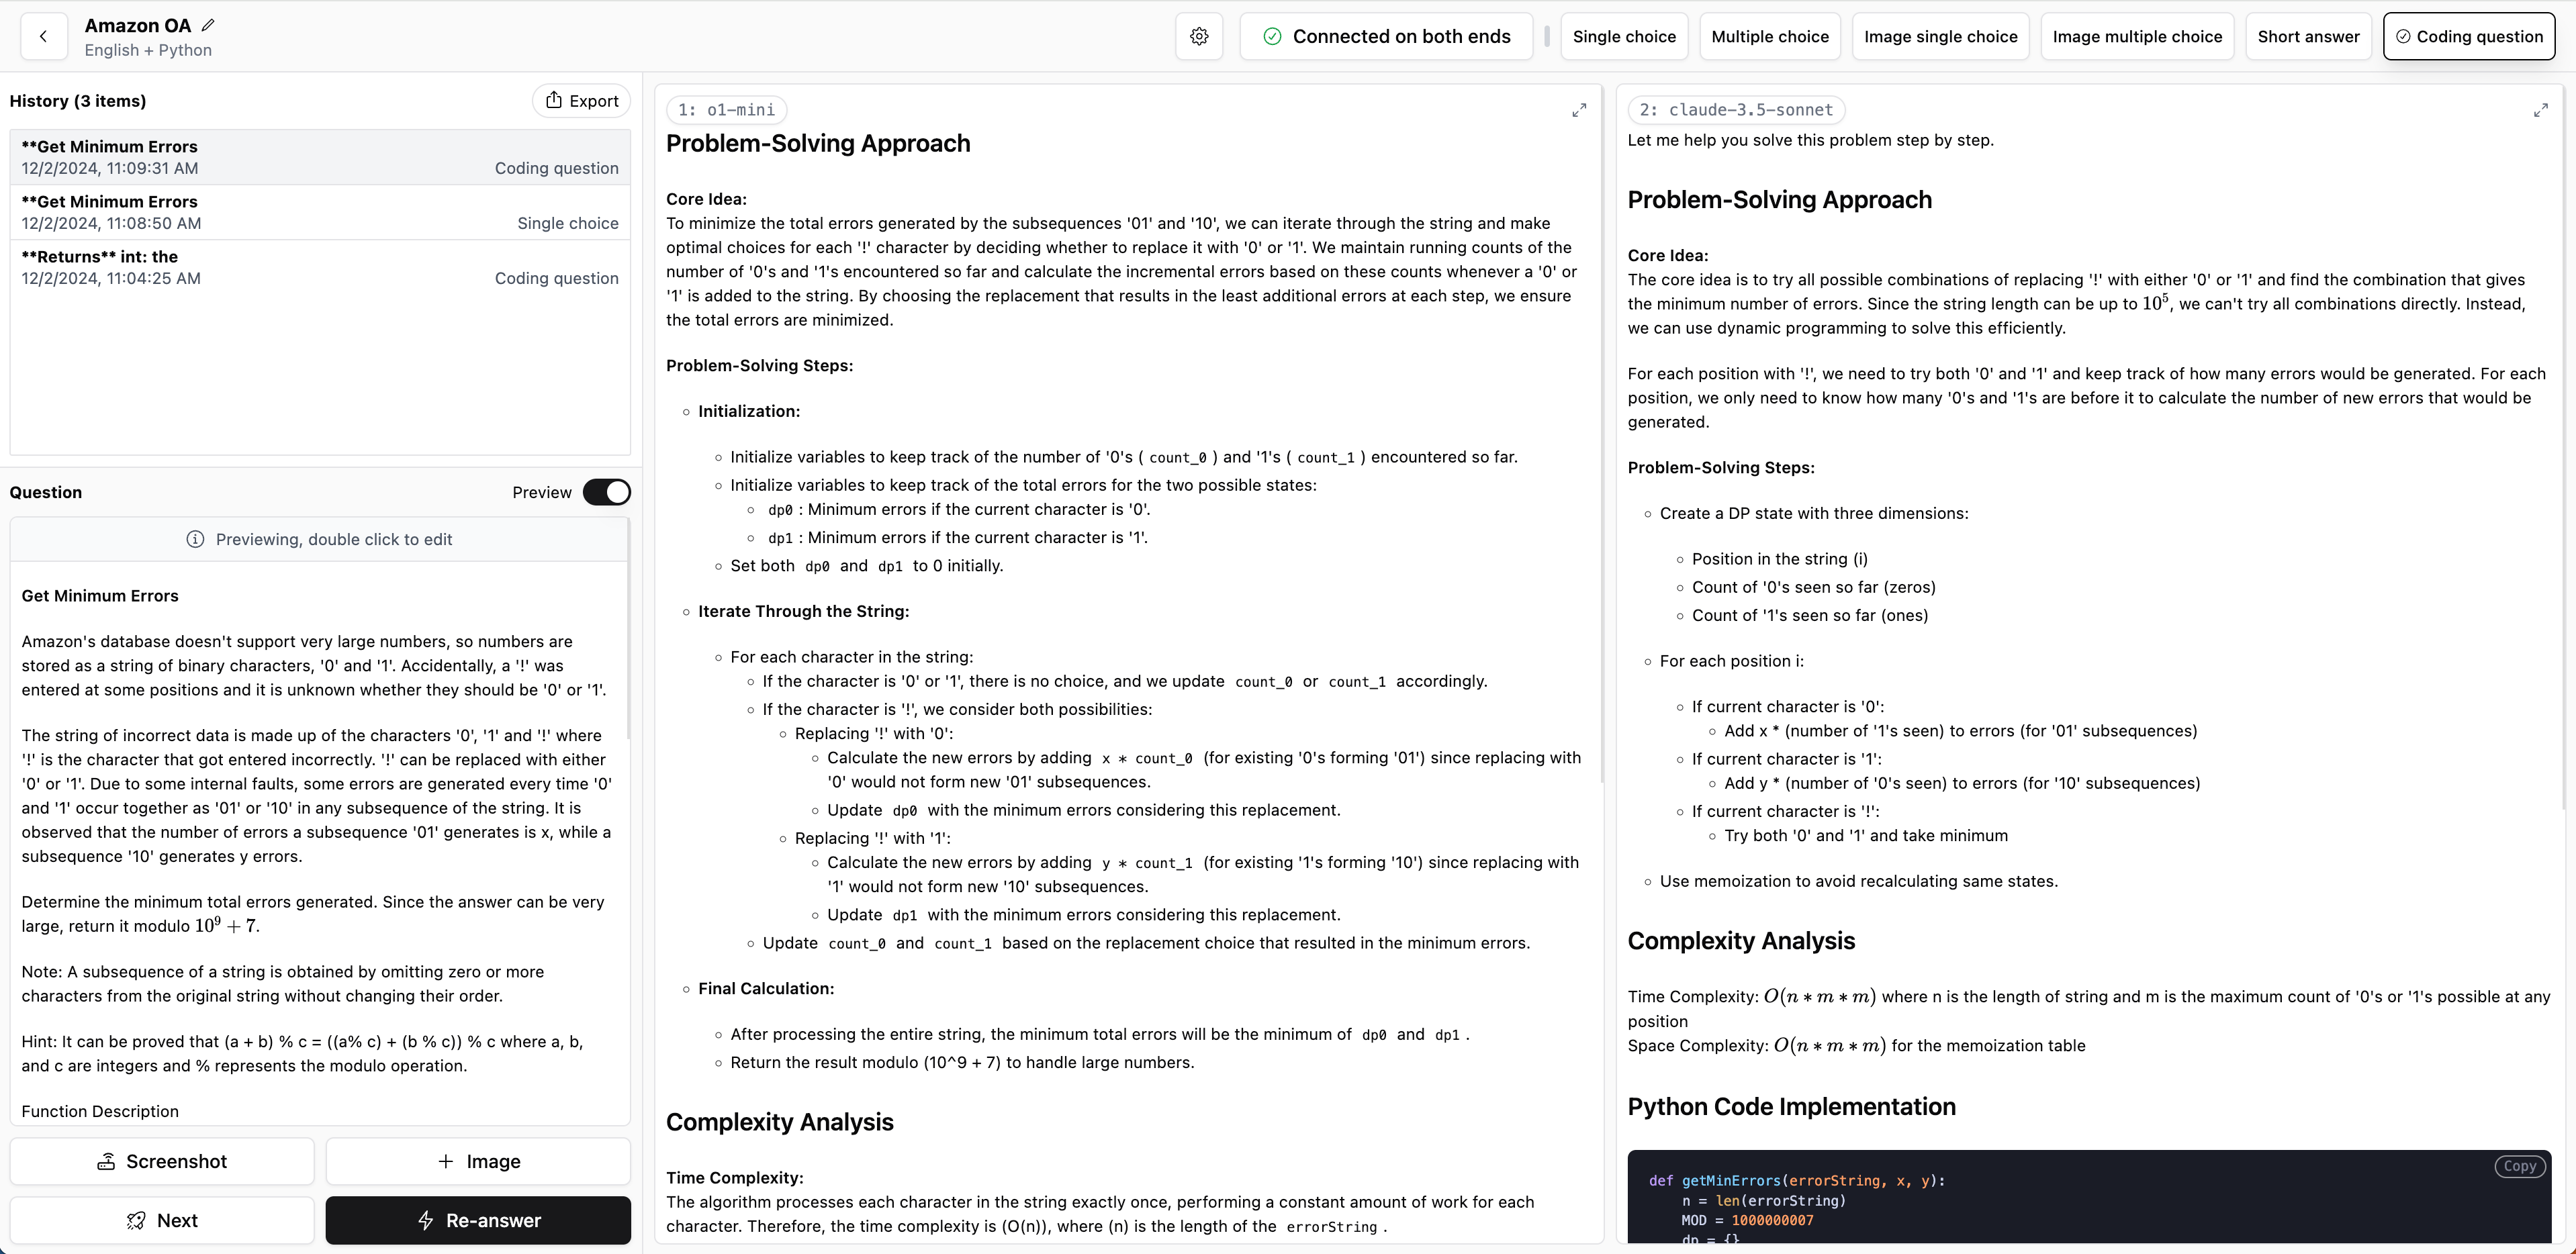
- Practice with a real-world scenario on an OA simulation platform.
Reading Questions from Screenshots
- On the computer running the client, press Ctrl + Shift + Space to automatically send the screen image to the display device and trigger Quick Answer using screen recognition.
- On mobile devices, you can tap the screenshot button, which can also trigger a screenshot on the computer, providing a more discreet option.
- Any text copied on the client computer will automatically sync with the display device, enabling Quick Answer without leaving the keyboard.
Long Screenshots:
For Online Assessment scenarios, we support inputting multiple screenshots to handle lengthy questions. Here’s how it works:
- Trigger a screenshot using the methods described above.
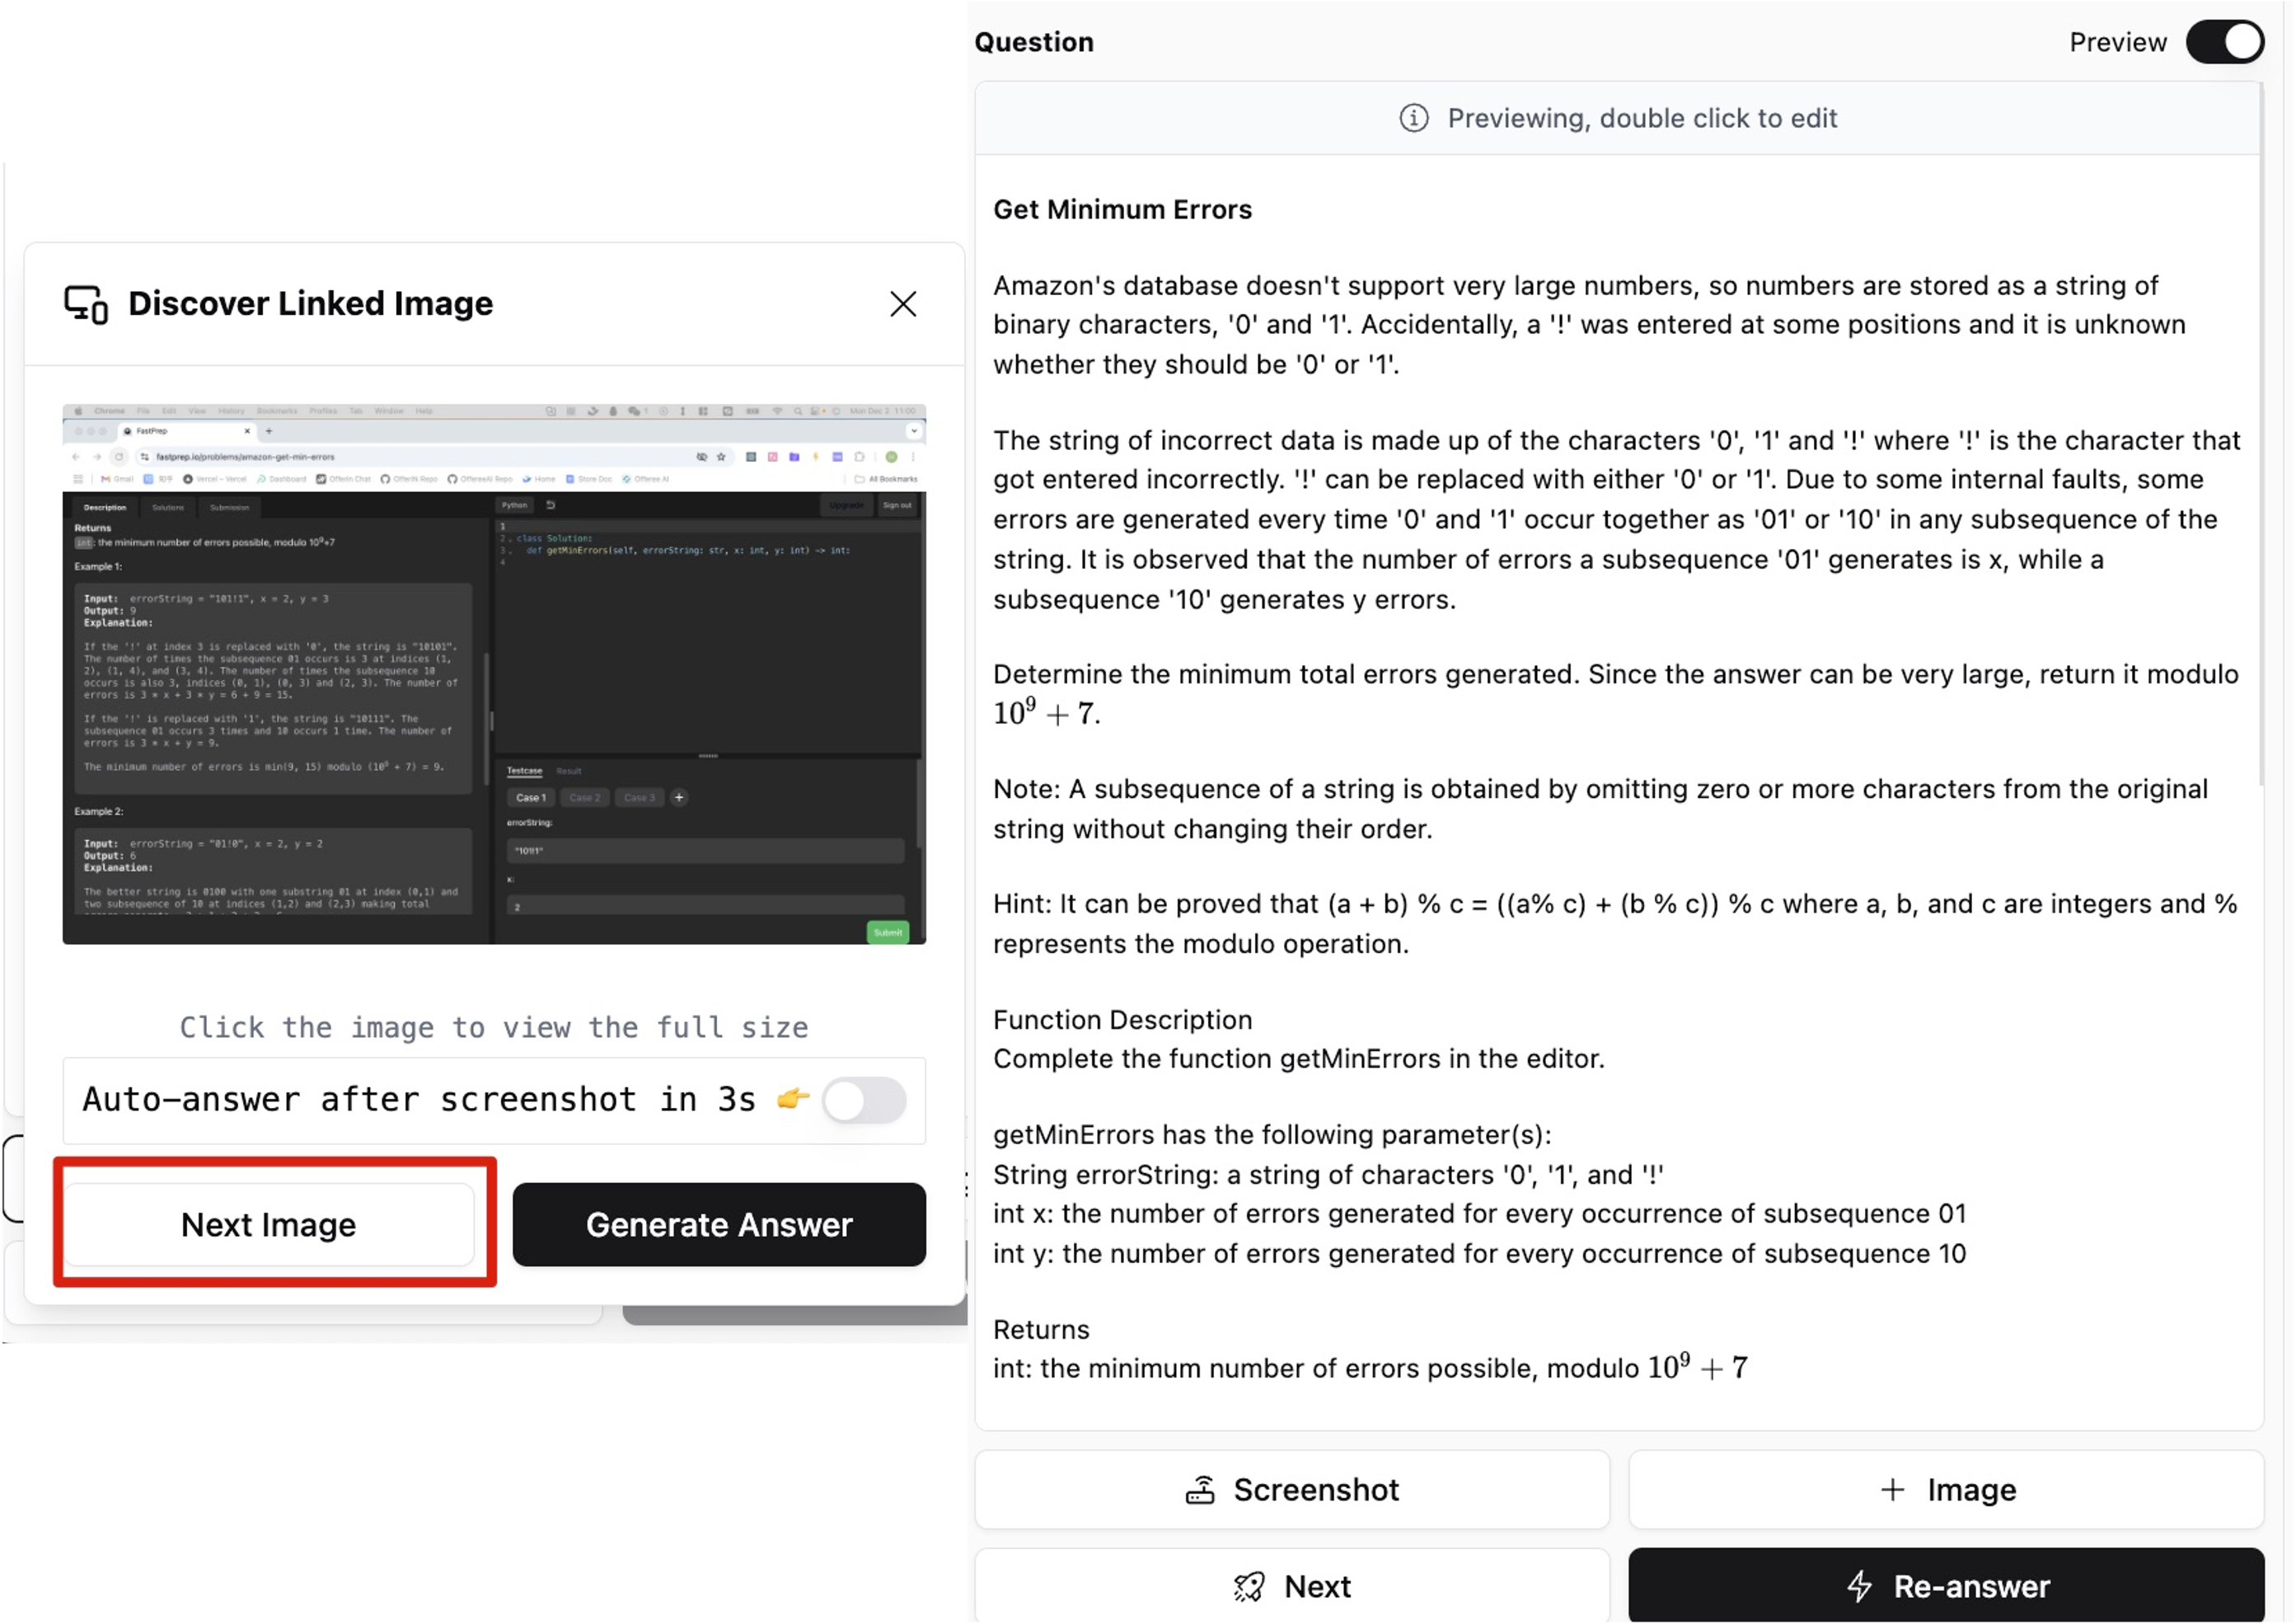
- Click
Next Image, adjust the question position, and clickScreenshotagain to capture more of the question until it’s fully captured. - A slight overlap between screenshots will not affect recognition.
